

Congratulations
You have successfully run the analyses for all 500 of the virtual populations created in Virtual Population for each sample size, design type, scenario, and treatment allocation ratio.
To navigate to Study Design and Analysis click on View in the Study Design and Analysis panel.
To investigate multiple sample sizes in your virtual trial you can add these all the number of subjects to be evaluted within a trial.
In the field Sample Size enter the following samples size; ‘200’
Click Save in the top right, and see the sample size appear on the left of the window, indicating the information has been saved.
Repeat this for the following Sample Sizes; 400, 600, 800, 1000, 1200, 1400, 1600, 1800, 2000
Click Save
These are an advanced feature of KerusCloud when considering the recruitment of subjects. This is not used in this tutorial.
To navigate to Allocations, click (3) Allocations at the top.
Allocation tab: Specify the allocation ratio of treatment to subjects. Enter ‘Rand’ into the Identifier field.
Under Defined By click on Population
Click on Population, and under Allocation Inputs enter 1 into both the Placebo and Active fields. This specifies that equal numbers of subjects will be randomised to each treatment group.
Click Save on the top right
You will see Rand appear on the left of the window, indicating the information has been saved.
To navigate to Analysis, either click (4) Analysis at the top.
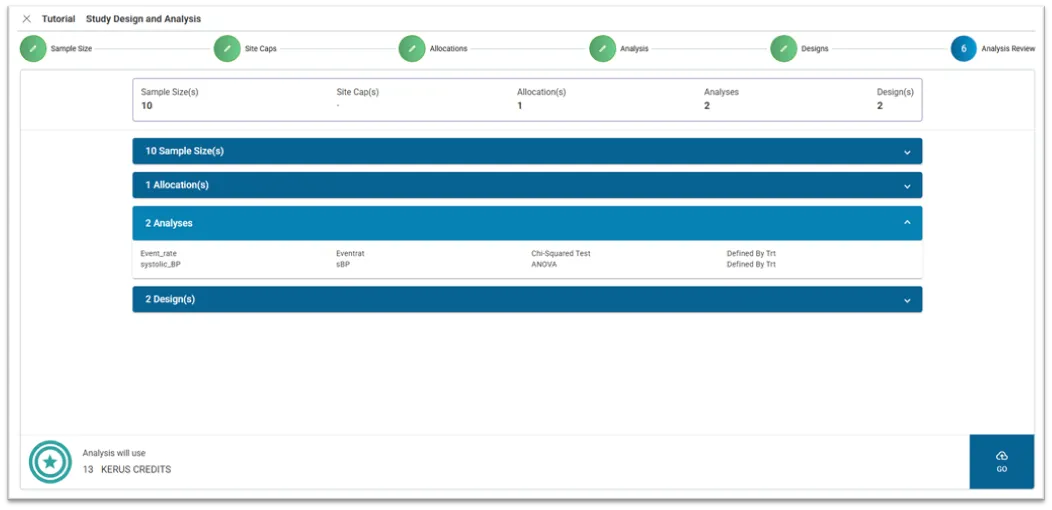
Set up an analysis for the event rate data using a chi-squared test and then set up an analysis for the blood pressure variable using an analysis of variance test.
Under New Analysis type in an Identifier for the analysis: ‘Event_rate’
Under Select Variable, Select Eventrat
Under Select Test, Select Chi-Squared Test
Under Defined By select Trt
Click on Save in the top right
Event_rate will appear on the left of the window, indicating the information has been saved.
Under New Analysis type in an identifier for the analysis: ‘systolic_BP’
Select sBP and select ANOVA
Under Defined By select Trt
Under Adjustment Method select Tukey
Click on Save in the top right
systolic_BP will appear on the left of the window, indicating the information has been saved.
Navigate to Designs, either by clicking on (4) Designs at the top, or Next in the bottom right. In this instance, we want to explore two options, one fixed design, where the recruitment continues to the planned sample size without any interim analyses, and a second design where there is an interim analysis after 80% of the trial has been recruited, with an option to stop at this point for futility. To implement this, we will tell KerusCloud to stop the trial for futility after 80% of the participants have been recruited if the treatment effect p-value is > 0.5 at the interim analysis in the Stroke event rate analysis.
Under New Design type in an Identifier: ‘FixedAD’
Add a description: ‘Fixed design’
Select Design Type and select Fixed
Click on Save in the top right
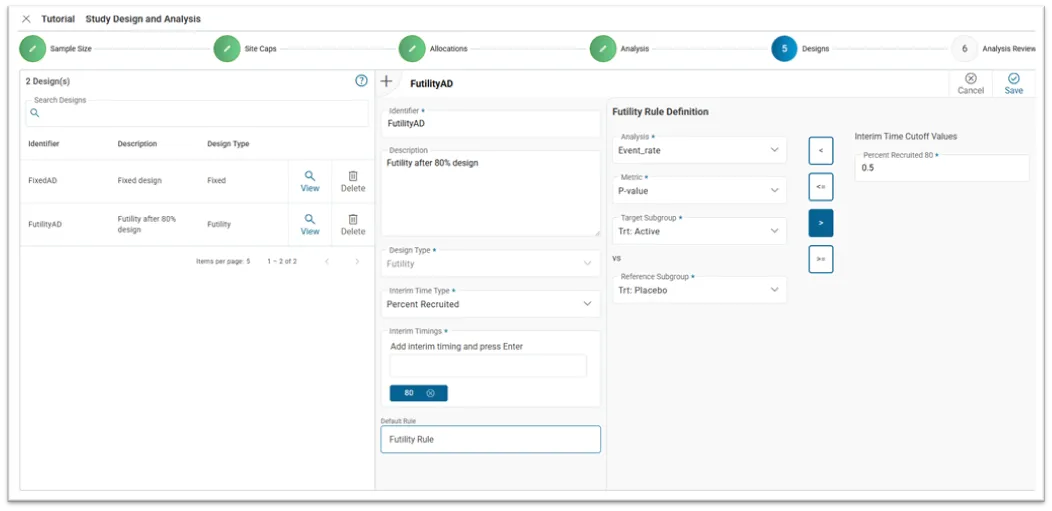
Under New Design type in an Identifier: ‘FutilityAD’
Add a description: ‘Futility after 80% design’
In the Design Type drop down select ‘Futility’
Select ‘Percent Recruited’ in the Interim Time Type dropdown
Insert 80 into Interim Timings (%) and press Enter
In the Futility Rule Definition, in Analysis select Event_rate
In Metric, select P-value
In the first Subgroup, select Trt: Active
In the second Subgroup, select Trt: Placebo
Click on the greater than symbol (>) and enter 0.5 in the Interim Time Cutoff Values box
Click on Save in the top right
The two design types will appear on the left of the window, indicating the information has been saved.
Navigate to the Analysis Review section, either by clicking on (6) Analysis Review at the top.
Congratulations
You have successfully run the analyses for all 500 of the virtual populations created in Virtual Population for each sample size, design type, scenario, and treatment allocation ratio.